Getting started at LostCousins
by Peter Calver
It's surprisingly easy to search for
living relatives at the LostCousins site, and in this article I'm going to
demonstrate how you can use census information you've found at the free
FamilySearch site to connect with your living relatives.
Start by clicking here
to go to the 1881 England & Wales census search page:
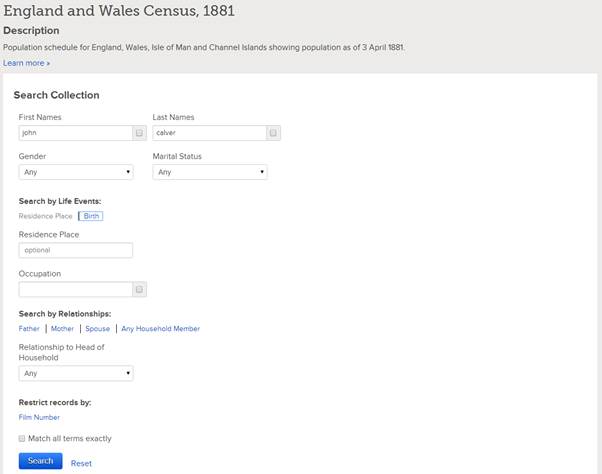
As you can see, I've typed in the name
of my great-grandfather, John Calver; next I'm going
to click on the Birth link so that I
can enter his approximate date of birth:

Tip:
on most websites blue text indicates a link, ie
something you can click
I could enter more information but
there's the danger that some small discrepancy will prevent the right record
being found - unless you're looking for someone with a very common name it's
best to enter as little as possible on the Search form (you can always enter
more if necessary).
Here's what I get when I click the ![]() button:
button:
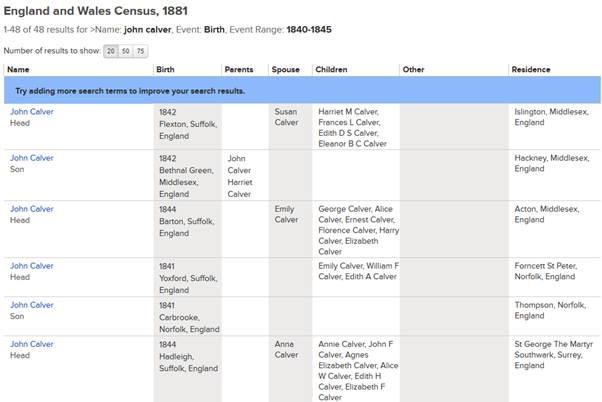
The third entry down is the one I'm
looking for - my ancestor was born in Great Barton, Suffolk and although his
birthplace isn't shown correctly, I can see that my grandfather Harry Calver is listed as one of the children of the household.
Tip:
it's usually best not to enter a birthplace when you're searching the census
because they were so often written down incorrectly, or mistranscribed.
And a surprisingly large number of people simply didn't know where they were
born - you might well know more about where your ancestor was born than he did!
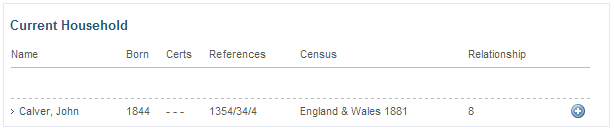
When I click my ancestor's name I get
the following page, which shows all the members of his household:
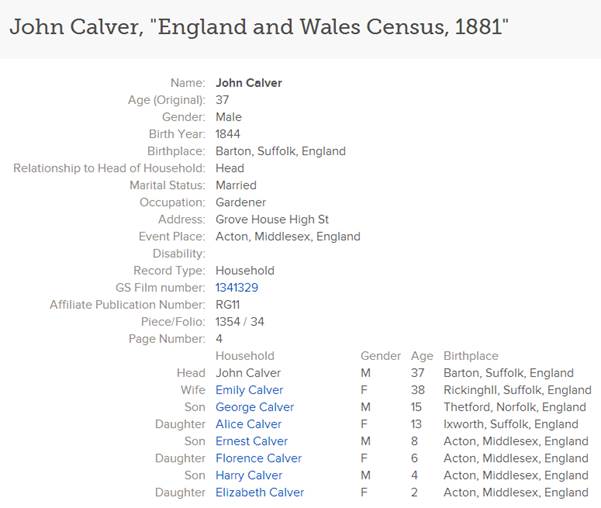
This is great - on a single page I've
got all the information I need to be able to enter my great-grandfather and his
family at LostCousins! I usually print the page for easy reference (there's a Print link at the top right of the page
- not shown in this screenshot), but it isn't essential.
Now open another tab in your browser (or
another browser window), log-in to your LostCousins account, and click My Ancestors in the menu that runs down
the left hand side of the screen:
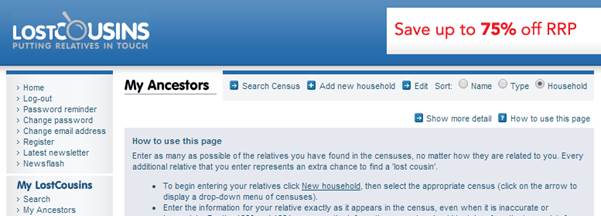
Tip:
if you haven't entered any relatives on your My Ancestors page the 'How to use
this page' advice is displayed by default; once you start entering information
it will be hidden, but you can make it visible again by clicking ![]() at the top
right.
at the top
right.
To enter your first relative click ![]() at the top of
the page (as you'll see shortly, there's a quicker and easier way to add
someone to an existing household):
at the top of
the page (as you'll see shortly, there's a quicker and easier way to add
someone to an existing household):
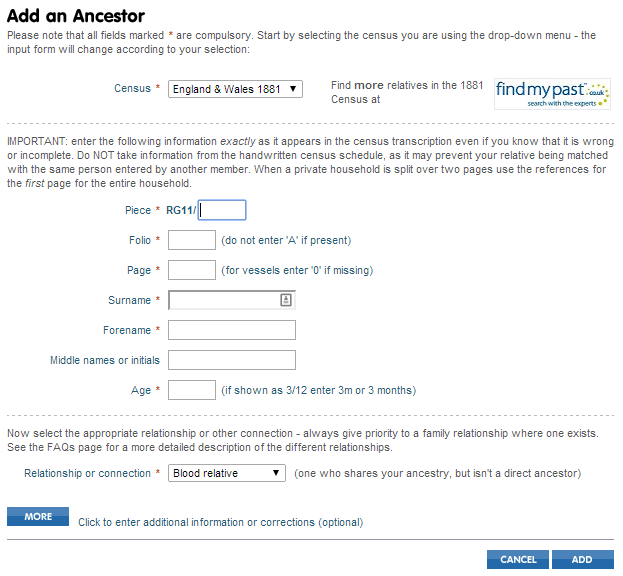
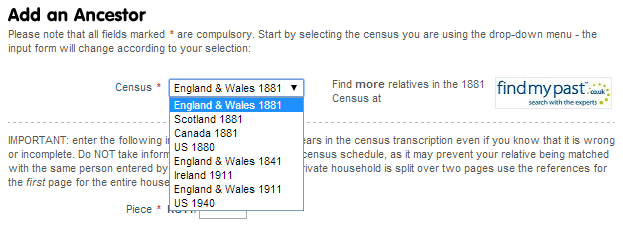
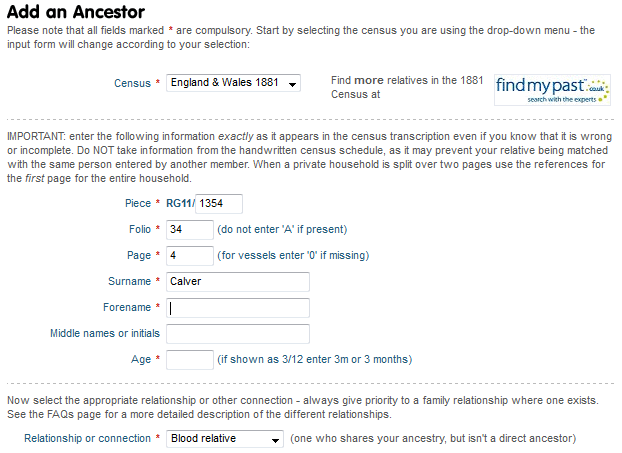
The instructions on the form are there
to help you, and answer most of the questions you might have; they vary
depending on the census. Always start by checking that the correct census is
selected - if not, click the arrow and choose the right one from the dropdown
menu, ie:
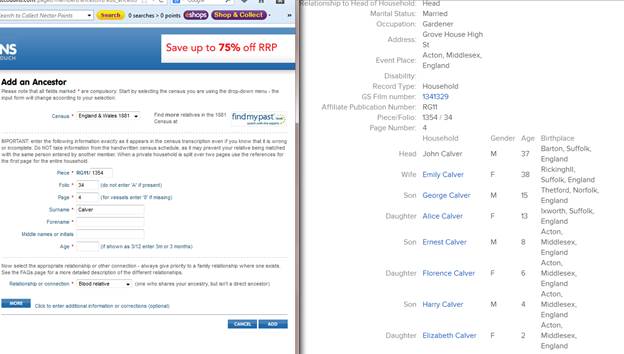
The form might look a bit daunting the
first time, but remember what I said about the printout from FamilySearch - it
contains ALL of the information you need. Start by entering the census
references - these are important because they identify the precise page on the
census (out of over a million pages) where the household can be found:
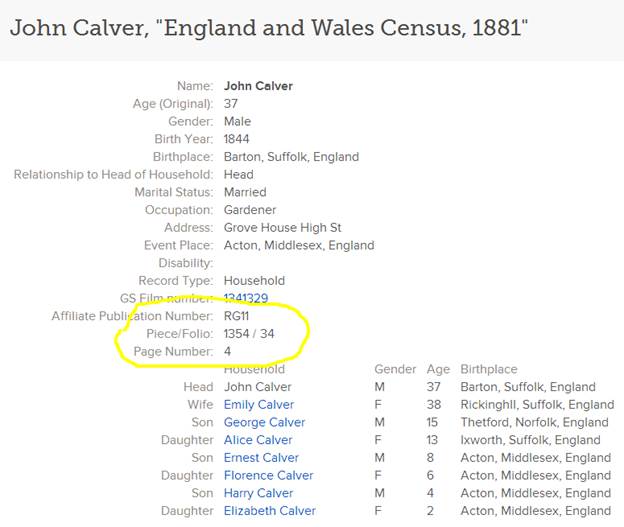
I've highlighted the census references
just in case you didn't spot them. RG11 is the National Archives reference for
this census - you don't need to enter it because it's the same for every record
in this census, but it's useful to know what it means.
Just to make things slightly confusing
FamilySearch put two of the references on the same line, separated by a /
symbol. Don't let this confuse you - they are completely separate and should be
entered in different boxes on the Add an
Ancestor form:
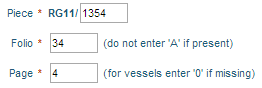
The good news is that you only need to
enter these references once for each household - and whilst households can be
split over two census pages, for simplicity we use the references for the head
of household to cover everyone.
Next enter your relative's surname,
first name, middle names or initials (if shown on the census), and age:
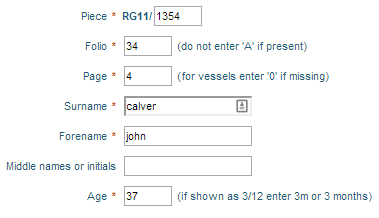
Note that on
this part of the form you don't need to worry about entering capital letters -
however you type a name it will end up with the first letter, and only the
first letter, capitalised. This saves you time and ensures consistency.
Next choose
the appropriate relationship - this is important. Someone from whom you are
directly descended is a direct ancestor
- this includes your parents, their parents (your grandparents), their parents
(your great-grandparents), and so on as far back as you've been able to
research.

Tip: you can download a blank Ancestor Chart from the
LostCousins site - it's got spaces for 5 generations of your direct ancestors,
all the way back to your 32 great-great-great grandparents. The Ancestor Chart
shows a number for each which defines their position on your tree - entering
the Ancestor (or Ahnentafel) Number in the box provided is a very good idea
(although it isn't compulsory).
Most of the
people on your family tree - and most of the people you'll be entering on your My Ancestors page - are blood relatives - so called because they
share some of your ancestors (and some of your DNA).
Not everyone
on your tree shares your ancestors - there will be some who are only connected
to you by marriage, and there could
also be some who are related by adoption (legal or otherwise - remember
that adoption was only legally regulated from 1927).
Note:
it's also possible to enter people who aren't on your tree, but why you might
want to do that is beyond the scope of this article. However it's worth
mentioning now that you shouldn't enter your spouse's relatives or a friend's
relatives (because the LostCousins system won't work properly); instead open a
separate LostCousins account for the other person, even if you're the one doing
the research on their behalf (you can use your own email address if you wish).
That's all the information that needs to
be entered. But if you wish you can also complete the optional part of the form
- this might include corrections or information such as a married woman's
maiden name. Whether you add this optional information is up to you - it's
primarily for your own use - but I do recommend that if your relative's surname
is shown wrongly you enter the correct spelling and that you also enter maiden names
where known. Information you enter in the optional part of the form isn't
automatically capitalised.
Finally click ![]() to save
the information you've entered - here's an example of what you'll see next:
to save
the information you've entered - here's an example of what you'll see next:
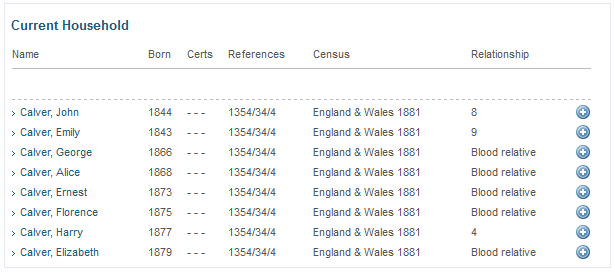
Now that
you've entered the first person in the household, usually the head of
household, the next step is to enter the other members. Remember that I said
earlier that this would be easy - I can simply click the ![]() symbol
at the end of the line to add another member of John Calver's household:
symbol
at the end of the line to add another member of John Calver's household:
All the information on the form has been
filled in automatically - all I need to enter for my great-grandmother Emily is
her forename, her age, and her relationship (she's also a direct ancestor, or
course).
So whilst it might have taken you 30
seconds to enter the first person in a household, the others could take 10 seconds
or less - typically an entire household will take just 1 or 2 minutes:
Once you've
finished entering your first household click ![]() to start on the next - it really IS that easy!
The more relatives you enter the more cousins you're likely to find - not just
immediately, but over the course of your membership - so if you have time,
enter ALL the relatives you can find on the 1881 Census.
to start on the next - it really IS that easy!
The more relatives you enter the more cousins you're likely to find - not just
immediately, but over the course of your membership - so if you have time,
enter ALL the relatives you can find on the 1881 Census.
Tip: whilst you're entering relatives only the current
household is shown - this makes the process much faster, especially for those
members who have thousands (!) of entries
The most
exciting part is when you search for 'lost cousins', which you can do at any
time by clicking the ![]() button. Each time you press the button EVERY
entry on your My Ancestors page - not
just the most recent - is compared against the millions of entries made by
other members, yet you'll find out in a matter of a few seconds what new
matches have been found!
button. Each time you press the button EVERY
entry on your My Ancestors page - not
just the most recent - is compared against the millions of entries made by
other members, yet you'll find out in a matter of a few seconds what new
matches have been found!
More tips
- If you don't want to print out the page at FamilySearch
which shows the household you're planning to enter another option is to
open a second browser window (rather than having two tabs in the same
browser window) - this enables you to see the page at FamilySearch whilst
you're entering the data on your My
Ancestors page. In the screenshot below I've used two different
browsers (Firefox and Chrome), but you could use two instances of the same
browser.
- Perhaps surprisingly, the relatives most likely to link
you to your 'lost cousins' aren't your direct ancestors or the members of
their households, but the members of their extended families. Nevertheless
it makes sense to start by
entering the households of your direct ancestors - but don't stop there!
- More of your cousins have entered relatives from the
1881 Census than 1841 or 1911; if you're looking to connect with new
cousins it's best to delay entering anyone from 1841 or 1911 until you've
entered everyone you can find in 1881.
- Relatives in a household are shown in the order of entry
so, if it's important to you that they appear on your My Ancestors page in the same order as on the census, then
that's the order in which you should enter them. However, it won't affect
your chances of finding cousins because the site matches individual
relatives, not households.